Follow the attachment below to properly install a SW1.
Tools Required:
Tape Measure
Phillips Head Screwdriver
Parts Included:
(1) SW1
(4) 10-24 x 7/8” Phillips Pan Head Screws
(4) 10-24 x 1” Phillips Pan Head Screws
(2) Sets of Accessory Mounting Brackets
(4) #8-32 x 1/4” Phillips Pan Head Screws
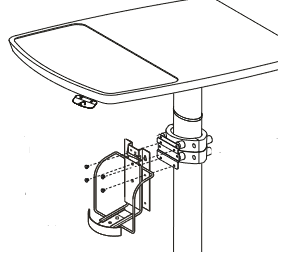
1. Measuring 3” down from the top of the column, attach (1) set of the accessory mounting brackets to the column using (2) 10-24 x 1” Phillips pan head screws. Directly below the first set of accessory mount brackets, attach the second set of accessory mounting brackets to the column.
2. Align the 4 holes (no threads) of the SW1 with the 4 holes from the accessory mounting brackets. Using the screwdriver, secure the SW1 using the (4) #10-24 x 7/8” screws provided (figure 1).
3. Align the 4 holes on the Sani-Wipe cannister holder (sold separately) to the 4 remaining threaded holes on the SW1. Using the screwdriver, secure the Sani-Wipe cannister holder to the SW1 with the (4) #8-32 x 1/4” screws.
|
Figure 1. The accessory mounting brackets aligned on the column with the SW1. |
If you have any questions, contact Altus at service@altus-inc.com or (616) 233-9530. If immediate assistance is needed, please call as soon as possible so we may help.
Comments
0 comments
Please sign in to leave a comment.