Follow the attachment below to properly install a BCH14.

Tools Required: Phillips Head Screwdriver
Parts Included:
(1) BCH-14
(4) M4x0.7x10mm Phillips Pan Head Screw (4) M4x0.7x16mm Phillips Pan Head Screw
1. Remove the monitor from the LCD Monitor Support and remove all four screws from the rear side of the monitor.
2. Partially insert and tighten the (2) M4x0.7x16mm screws into the top two holes in the rear side of the monitor.
3. Slide the monitor onto the VESA plate of the FSA so the screws rest in the slots. Slide the BCH-14 holder up and into position (so top slots of bracket are lined up with screws.
4. While holding the BCH-14 in place, insert and tighten the bottom (2) M4x0.7x16mm screws into the monitor.
5. Fully tighten the top (2) M4x0.7x16mm screws partially secured in step 2.
6. The width of the barcode holder can be adjusted by loosening the (2) screws on the rear of the arm of the BCH-14. Once desired width is achieved, tighten the (2) screws.
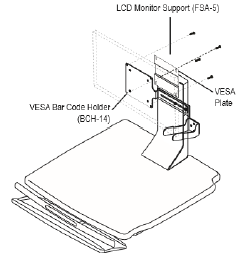
Figure 1. Attaching BCH-14 to the FSA.
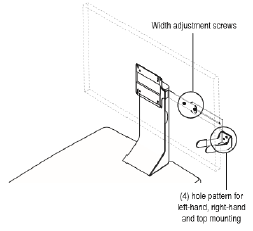
Figure 2. Adjusting the BCH-14 to reach around a larger monitor.
Note: This document shows the BCH-14 orientated on the right side of the monitor. The BCH-14 can be orientated to be on the left side or above the monitor with the rotation of the BCH-14 and the “fork” component.
If you have any questions, contact Altus at service@altus-inc.com or (616) 233-9530. If immediate assistance is needed, please call as soon as possible so we may help.
Comments
0 comments
Please sign in to leave a comment.