Follow the attachment below to properly install a laptop in the HLC7P2.
Tools Required:
N/A
Parts Included:
(1) HLC7P2
(2) Key
HLC7P2
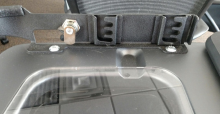
Pictured above is the cart’s locking mechanism. This is where the four circular pegs must line up.
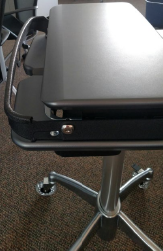
1. To remove the upper worksurface for installing the laptop, unlock both sides of the metal bracket between the upper and lower worksurfaces. Lock needs to be in horizontal position.
2. Push the upper worksurface toward the rear of the cart. It sometimes takes a little force, especially when the cart is new.
3. Lift off the upper worksurface.
4. When reinstalling;
A. Make sure the lock key insertion slot is horizontal on both locks.
B. Be sure the waterfall (tapered) edge is toward the rear of the cart.
C. Install both sides at the same time to prevent misalignment.
D. When the upper worksurface has been reinstalled in the desired position, rotate each lock so the key insertion slots are vertical.
If you have any questions, contact Altus at service@altus-inc.com or (616) 233-9530. If immediate assistance is needed, please call as soon as possible so we may help.
Comments
0 comments
Please sign in to leave a comment.